Halcyon R14 battery pack upgrade.
While I really like some of the Halcyon R14 ( Suex Joy) DPV design features I am pretty disappointed in its range/ run time and speed. Not a lot can be done to make it run faster but its not all that hard to extend its range.
The stock battery pack is made up of 20 x 1.2 volt 14 amp-hour NiMh cells wired in serried to give 24 volt nominal ( +-28volt max) which equates to ( 20 x 1.2 x 14=) 336 watt hour. In other words it will run a 336 watt motor for an hour. And as it turns out the R14 is rated at +- 1 hour run time on high, So we can assume it has a +- 336watt motor.
The obvious choice of battery to upgrade it to is Li Ion. Li Ion has a much higher capacity density than NiMh. It is also much lighter which is a slight issue ( more on that later).
I chose to use Panasonic NCR 18650 34B cells.
Quick look at the specs...
Weight 45grams
Volts 3.7 nominal 4.2 max
Amp Hour 3.250 min 3.350 typical
Width 18mm
Length 65mm
Discharge rate C2 ( Capacity x 2 or 1/2 hour)
To get close to the stock packs voltage I needed to use 7 cells in series. This would give me ( 7 x 3.7=) 25.9 volt or 29.4 volt max.
The more cells I can get in parallel the more capacity or run time I can get.
The obvious option is to put as many cells in as possible. There is quite a bit of space in the forward compartment of a R14. Getting (13x7=) 91 cells is doable. That would result in a pack of 1130 watt hour and still require extra lead to make it weigh as much as the stock NiMh pack!
The main problem with this is that it would require some modifications to the battery mounting system and this would mean that its not that easy to swap back to the NiMh pack if needed for travel.
The next option is a pack that can easily be swapped out for the stock pack. I worked out that a pack of 70 cells in a 5x7 x 2 rows would work well in this situation and could be swapped out as easily as a second NiMh pack while supplying 870 watt hours or over 2.5 times stock!
I went for option 3. I wanted to have the battery pack in its own seal container and have it easily swapable for the stock pack.
I figured that I could fit a tube of 134mm OD in between the 3 rods that hold the front weight of the R14 and it could hold 3 rows of cells. This allowed 63 cells (just) but I needed to add a BCM to protect the battery pack. So I needed to reduce the pack to 56 ( 7Sx8P). This would still give me 694 watt hour or over twice the stock pack. To swap it out from the stock pack all that is required is to remove the front weight ( 3 hex screws) remove the stock battery mounts, put the Li Ion pack in and replace the front weight.
Bill of materials
Canister 132mm OD acrylic tube 5mm wall 250mm long plus end caps
50amp Anderson connectors
Bellow is a few photos of the semi assembled pack.


Next up is to weld the battery pack up using a capacitive discharge welder ( another previous project) and complete the battery canister.
With the use of my lathe I will machine up the end caps to the canister. One will be glued into place and the other will be a push fit/ Oring seal.
16/07/2016 Update:
Today I started the process of welding up the cells to for the battery.
To do this I used a Capacitive Discharge Welder that was another DIY project of mine some years back.
My CD welder is of the more basic variety and consists of only a few components unlike some of the more elaborate types out there some of which are micro processor controlled.
I use a single 2 farad car audio capacitor that charges via my lab variable voltage power supply and a pair of SCR's to discharge it via a pair of copper probes. It seems to work well with sub 0.1mm nickle strip but struggles with the thicker stuff.
The photo below shows one completed row of cells.

10/08/2016 Update:
By luck I did a job for a guy who runs an acrylic fabrication business and he was able to glue/weld the battery case for me and supply a sheet of acrylic I needed for the top lid. I soon added the two cable glands for the cables and finished off the battery.
I did a load test on the battery ( after it was charged 2 weeks ago) and the result was 555wh. This was some what less than expected. After checking the pack I found one string was lower by 0.5 volt that the rest and assumed this is what caused the pack to shut down prematurely.
After a recharge and a balance charge of the pack I dd another load test.
I will try and graph the results later but this is a synopsis of what I found.

No Load voltage fresh charge 29.37volt
Using a Silent Submersion load tester...
27 volt 494 watt 18 amps. According to Mr Ohms this is a 1.5ohm load some what a greater load than the stock R14 motor by 50%.
After 90 minutes I had 21.5 volt,310 watt,14.46 amp and a total of 24.9 amp hour/ 569 watt hour.
The pack shut down 8 minutes later with no final data. But I can extrapolate it out to +-
20 volt, 285 watt 13.8 amp 27 watt hour/620watt hour.
At first glance these are not quite the results I had hoped for.
The pack does not deliver 680+ wh. But it does supply the expected Ah of 26.4Ah.
Regardless I am confident it will supply twice the distance and or run time of a standard R14 NiMh pack.
After the discharge the pack was noticeably hot to the touch. While I had no way to measure the heat I can say it was not so hot that I couldnt hold my fingers on it but it did become uncomfortable after 10-15 seconds. This was pretty much a worse case scenario +50%. It should never get this hot even when run at top speed for 2 hours!
Final work to be done is to fabricate a lead weight to allow for the difference between the NiMh pack and Li Ion pack.

28/08/2016 Update
And finally its complete!
Dues to the light weight nature of Li Ion I needed to add about 2.4 kgs of lead. I also had to replace the salt/fresh water trip weight as the new battery pack fouls with it.
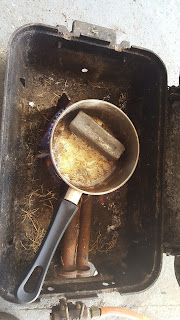
Out with the BBQ and lead pot. The trim weight was easy. I had some aluminium tube that I cut to the right length and then filled with molten lead. Once cool the lead dropped out of the tube.
I then put the lead rod in the lathe and machined it fit. The weight ended up being close enough to match the original trim weight but shorter. If anything this may slightly affect the trim but I doubt it will be much at all ( nothing a snap bolt on either end wouldnt fix).
The main weight was a little more difficult as it needed to be curved to wrap around the battery pack.
First try I made a mold from wood. The problem here was the wood burnt and off gassed leaving the lead to bubble away as it cooled. This weakened the lead.
Try again but this time using a sheet of aluminium as the base of the mold. Perfect!
I then proceeded to beat the hell out of the 16mm thick lead plate and get some curve into it.
Then weigh it all up to find I was a 200 grams to heavy. So out with the hacksaw to trim off some excess weight and then its all done ready for testing.
I do hope its not too front heavy or I will have to do more cutting of the plate and move some lead around to the centre section.
For now I have taped the weight in place but come Monday I will be off to get a pair of suitable hose clamps!


16/07/2016 Update:
Today I started the process of welding up the cells to for the battery.
To do this I used a Capacitive Discharge Welder that was another DIY project of mine some years back.
My CD welder is of the more basic variety and consists of only a few components unlike some of the more elaborate types out there some of which are micro processor controlled.
I use a single 2 farad car audio capacitor that charges via my lab variable voltage power supply and a pair of SCR's to discharge it via a pair of copper probes. It seems to work well with sub 0.1mm nickle strip but struggles with the thicker stuff.
The photo below shows one completed row of cells.

10/08/2016 Update:
By luck I did a job for a guy who runs an acrylic fabrication business and he was able to glue/weld the battery case for me and supply a sheet of acrylic I needed for the top lid. I soon added the two cable glands for the cables and finished off the battery.
I did a load test on the battery ( after it was charged 2 weeks ago) and the result was 555wh. This was some what less than expected. After checking the pack I found one string was lower by 0.5 volt that the rest and assumed this is what caused the pack to shut down prematurely.
After a recharge and a balance charge of the pack I dd another load test.
I will try and graph the results later but this is a synopsis of what I found.

No Load voltage fresh charge 29.37volt
Using a Silent Submersion load tester...
27 volt 494 watt 18 amps. According to Mr Ohms this is a 1.5ohm load some what a greater load than the stock R14 motor by 50%.
After 90 minutes I had 21.5 volt,310 watt,14.46 amp and a total of 24.9 amp hour/ 569 watt hour.
The pack shut down 8 minutes later with no final data. But I can extrapolate it out to +-
20 volt, 285 watt 13.8 amp 27 watt hour/620watt hour.
At first glance these are not quite the results I had hoped for.
The pack does not deliver 680+ wh. But it does supply the expected Ah of 26.4Ah.
Regardless I am confident it will supply twice the distance and or run time of a standard R14 NiMh pack.
After the discharge the pack was noticeably hot to the touch. While I had no way to measure the heat I can say it was not so hot that I couldnt hold my fingers on it but it did become uncomfortable after 10-15 seconds. This was pretty much a worse case scenario +50%. It should never get this hot even when run at top speed for 2 hours!
Final work to be done is to fabricate a lead weight to allow for the difference between the NiMh pack and Li Ion pack.

28/08/2016 Update
And finally its complete!
Dues to the light weight nature of Li Ion I needed to add about 2.4 kgs of lead. I also had to replace the salt/fresh water trip weight as the new battery pack fouls with it.
Out with the BBQ and lead pot. The trim weight was easy. I had some aluminium tube that I cut to the right length and then filled with molten lead. Once cool the lead dropped out of the tube.
I then put the lead rod in the lathe and machined it fit. The weight ended up being close enough to match the original trim weight but shorter. If anything this may slightly affect the trim but I doubt it will be much at all ( nothing a snap bolt on either end wouldnt fix).
The main weight was a little more difficult as it needed to be curved to wrap around the battery pack.
First try I made a mold from wood. The problem here was the wood burnt and off gassed leaving the lead to bubble away as it cooled. This weakened the lead.
Try again but this time using a sheet of aluminium as the base of the mold. Perfect!
I then proceeded to beat the hell out of the 16mm thick lead plate and get some curve into it.
Then weigh it all up to find I was a 200 grams to heavy. So out with the hacksaw to trim off some excess weight and then its all done ready for testing.
I do hope its not too front heavy or I will have to do more cutting of the plate and move some lead around to the centre section.
For now I have taped the weight in place but come Monday I will be off to get a pair of suitable hose clamps!


Do you know where I could get a T16 Halcyon replacement battery?
ReplyDelete